
Complete Guide: How do I Make My Own Perfume?
This guide on how to make your own perfume using essential oils and other materials was developed to fill a gap between the advanced technical information available to experienced perfumers and the many sources on blending essential oils for health and beauty. We cover aromatherapy separately, focusing more on single essential oils or blends of a few oils.
For all of the marketing and consumer discussion of commercial perfumes, the world of do-it-yourself (DIY) perfumery is surprisingly opaque. Perhaps this is a reflection of the guarded nature of the commercial perfume industry, which converts a deep understanding of chemistry into narratives of romance and adventure and does not want the fun spoiled by too much focus on the process.
Much confusion also stems from the difficulty in separating DIY perfumery from DIY aromatherapy and naturopathy. Modern aromatherapy was developed in the late 19th century to treat illness and promote health through natural compounds that have pleasing smells. The action of an aromatherapeutic treatment is not based only or entirely on the smell of the treatment, but on how the compound interacts with the body. Perfumery, on the other hand, is focused on creating pleasing smells that at least do not cause harm to the body. There may be health benefits from some perfume ingredients separate from the scent’s effects on emotion, but this is not a primary focus. There are many ingredients that perfumers adore for their use in crafting pleasing scents that are being phased out of mainstream practice due to their ability to cause allergic reactions or other harm. There will be blends that fulfill the goals of both aromatherapy and perfumery with no compromises on either side, but these are the exception.
Note: As an Amazon Associate, we provide links to products on Amazon and may earn a commission on subsequent purchases. This allows us to reduce other forms of advertising on the site and to have more control over the products we recommend. We also believe that readers will have fewer concerns about scams when purchasing from Amazon, whatever else they think about the company. When the best product is not available on Amazon, we provide links to other sellers, but do not have any affiliate relationship with these sellers and do not earn any commission when you purchase on those sites.
We suggest that readers be especially careful when purchasing essential oils or “fragrance oils” recommended online. There are many websites selling adulterated or low-quality essential oils. In this guide, we include a review of reputable sellers, with which we are not affiliated, but suggest that readers check this list against suggestions on the Basenotes.net Fragrance DIY Forum or other reputable sources.
For a faster path into making and using scented materials, readers may find that our guide to making your own aromatic tinctures will let you experiment with creating at a lower cost and much lower learning curve.
Why Do You Want to Make Your Own Perfume?
I remember getting excited about brewing beer a decade or so ago. I did a lot of research, made a detailed shopping list, and drove off to the craft brewing supply shop with excitement. I said hello to the person working at the store; I was the only one there. I had a rickety shopping cart half filled with glass carboys, gas-powered kettles, hydrometers, auto-siphons, and other fun toys. The store owner wandered over slowly to offer help, which I tried to decline. Undeterred, they asked how long I had been brewing. I let them know this was my first time. They told me to leave the cart where it was and that they would re-shelve everything. They then grabbed a plastic bucket, a bag of premixed malt and hops, and the bare minimum needed to ferment and bottle a couple of cases of beer. They told me to come back and buy the fancy equipment when I was sure I was into it. I drank those beers, but I never brewed another batch. That store owner could have made more money on the transaction, but they were focused on building and supplying a craft brewing community with repeat sales.
You may consider going more slowly with your perfumery investment if you are planning on:
Making Your Favorite Designer Fragrance For Cheap: It is almost an impossibility for a brand new perfumer to get anywhere close to replicating the scent of a fine fragrance. A super fan of a specific perfume may have spent a great deal of time scouring the internet for a formula to recreate their target. Once a formula is found or purchased, they buy all the ingredients, mix things carefully, and make dozens of comparisons to the real deal on paper and skin, all to their disappointment. They then approach the DIY perfume community to seek “the answer” to why their formula is not working. There is no answer beyond learning how to create perfume.
Importing a Special Ingredient and Starting a New Perfume Line: There are a number of precious perfume ingredients (e.g. Mysore sandalwood) that are nearly impossible to acquire and/or are prohibitively expensive for use in any but the finest perfumes. There is a very active market selling counterfeit essential oils. It is highly unlikely that a small purchaser has identified a secret source of an expensive product at a steep discount that would allow them to become rich from DIY perfumery.
Discovering a New Hobby: This is most people new to DIY perfumery. You are interested in perfume. Maybe you like the scent of cooking or gardening. You love a certain perfume, but think you could fix an element to fulfill your ideal. You buy all kinds of stuff and then realize that maybe cooking and gardening are more fulfilling.
Define Your Motivation and Set Clear Goals
DIY perfumery has many facets that attract people for very different reasons. Some are interested in translating their understanding of chemistry to an artistic endeavor. Some are creating on the side of or retirement from employment in the perfume and flavoring industry, using their professional knowledge to explore the freedom of a hobbyist. Others love the way natural scents can deepen our connection to the earth and the people around us. A small proportion of these people will convert their DIY perfume experience into a livelihood.
Writing down why you are interested in learning to make your own perfume will help you to stay focused as you face setbacks and are lured by the many online schemes you will find (or will find you). Along with motivation, writing down specific goals with deadlines will help move you forward. It is very easy to let a strong training program lapse, particularly if you do not have a dedicated space and large blocks of uninterrupted time.
Create a Budget, and Stick to It
DIY perfumery is not, as the saying goes for owning a boat, like standing in a shower tearing up $100 bills. However, the costs can easily creep up on you as you learn and pursue a set of “ideal” ingredients to make whatever perfume you currently have in mind. Some people suggest buying only what you will need to make the next perfume. We suggest setting a monthly or quarterly budget and sticking to that. If you have to spend a lot getting set up with a scale and storage equipment, perhaps don’t buy all of the 100 “essential” ingredients in the first month or quarter.
Use the Power of Samples
You don’t need to purchase a large weight/volume of every ingredient when starting out. A 1 milliliter (ml) sample vial diluted to 10% is enough to train and conduct early experiments mixing 2 or 3 ingredients for a few months or more. A number of suppliers either sell sample sizes for most of their ingredients or include 5 samples with every order. We suggest building out your initial inventory with almost entirely sample-sized (~1 ml) set of purchases. This will allow you to purchase, for example, 10 different lavender samples.
Without taking this sample approach, we would not have had the revelation of lavender absolute, which is a soft, hay-like (due to the coumarin content), soapy dream compared to some of the other sharper lavender oils, or the surprise and fascination of the lavender Seville, which smells of leather, dried fruits, and cognac. We have since purchased larger volumes of three different lavender oils intended for separate perfume applications. The lavender absolute is particularly well-suited to creating barbershop scents, with bright menthol and citrus dropping through lavender and other florals into white musk, tonka, and moss.
Create a Spreadsheet to Track Expenditures
You will likely end up purchasing materials from a range of sellers with varying frequency. There may be certain expensive items that you will spread across your budget for a number of months. Given the allure of the next magic potion that attracts anyone getting into DIY perfumery, it is all too easy to go over budget for a long period of time. You could use output from a personal finance app like Mint, but it is probably easier to enter the purchase price into a cloud-based spreadsheet every time you buy something.
You may also want to track expenditures by individual product line so that you start to develop a sense of value ($/quality) for each ingredient and across sellers. Note that the quality of the same ingredient may vary across manufacturer, so that differences in prices for the same ingredient across retailers may actually reflect differences in quality.
What Should I Read to Learn About Perfumery?
Basenotes.net Fragrance DIY Forum
This is the most helpful source of information on how to get started in perfumery that I have seen anywhere in print or online. The group has a long history, with many of the members contributing for more than a decade. You will pick up quite a lot by lurking, but signing up as a member and asking questions could help if you have a question that hasn’t been addressed. In the past few years, the forum has had some tension between amateur-professional perfumers and newer members with some training and a goal of building their online profile by being controversial. As we noted at the beginning of this Guide, the tension between perfumery and natural perfumery/aromatherapy/naturopathy is an important distraction to the DIY perfumer. It may be the case that you realize you are more interested in aromatherapy than in perfumery and decide to find a better community fit. If you are doing this all alone, even with encouragement from family or friends, it is nice to have the social connection of the Forum. We find that using a search engine restricted to the site gives good results for addressing a specific question (e.g. do I need really need polysantol, ebanol, hindinol, javanol?). If you are new to the field, do read their sticky post at the top of the forum, which has some really nice information and links.
The Good Scents Company (TGSC)
This is not the first place that we would send someone starting out in DIY perfumery, but it is one of the most important resources once you get going for understanding how scents relate to materials, both natural and synthetic. This is the product of a family from over 40 years of work. It retains the style from the early days of the internet, but contains an updated wealth of information on perfumery. The database contents should not be read as definitive (e.g. substantivity or recommended usage may be quite different from other sources), but in general the answers you find here are very high quality.
Perfume and Flavor Materials of Natural Origin, Steffen Arctander (1960)

“The perfume and flavor trade has been veiled and concealed for decades, if not centuries. It is true that perfumery and flavor creation is an art and a science, and we all realize that the art cannot be taught or developed by research through generations. But it is the author’s firm belief that science is a necessary part of perfumery and flavor creation. Consequently, we should not conceal what is already known or what can be concluded from the facts.”
Sixty years after its first publication, this seminal volume on the properties of natural perfume materials remains an active part of the DIY perfumery conversation. The art and science of perfumery remains veiled, but much less so than when Arctander started his work in the 1950’s. This book stands the test of time for the insights that Arctander had into the performance of natural materials. We appreciate Arctander’s attention to the variation in characteristics across place due to terroir and processing methods. It also has a very useful definition of terms and review of methods of processing that is still informative. His multi-volume aromachemical encyclopedia is less current given the many new compounds that are in use.
How Do I Set Up My Workspace?

What to do if you have a dedicated room
The perfumer’s organ is a critical piece of equipment, the thing that allows the scientific aspect of the field to merge seamlessly with the artistic mind of the perfumer in order to create the art that is great perfume.
Ventilation
You want proper ventilation in your workspace for two reasons. First, you want the air around you to be as devoid of residual smells as possible so that you can focus on what is on your smelling strip or skin. Second, some chemicals used in perfumery can cause sensitization and others may be toxic given a high enough exposure. Ideally, you would have a ventilation fan pulling air from your workspace to an outside vent with a fresh air return and the correct heat/energy recovery ventilator. Thinking through ventilation issues is more important in rooms without a window. If you do have a window or ability to create cross ventilation with multiple windows, you don’t really need to do anything else but open the windows enough to dissipate the smell from your work. You may want to use a pair of box fans to accelerate the air exchange, with one fan pulling air in one window and another pushing it out a separate window. Make sure there is a good seal between the window and the fan. Some box fans come with a seal for this purpose.
Lighting
Either track lighting directed at your workspace or a task lamp (or both) are very important for at least noticing when you spill something.
Stackable Storage Drawers

Stainless Steel Sheet
Storage system
The classic perfumer’s organ is a u-shaped desk with a scale and other working materials on the desktop. Essential oils and aromachemicals are then stored in tiered shelving built onto the desk. The goal of the set-up is to have all materials within arm’s reach and to keep materials grouped in a consistent manner to aid the development of a mental map of all of the notes and their relationship to each other. One could build an organ from scratch, hire a carpenter, or purchase shelving that would approximate the set-up. Having removable bins is useful to be able to access the depth of the shelving unit without removing all of the bottles one by one. You will need 4-5” bin clearance to fit 30-60ml Boston round with polycone cap without too tight of a fit. The drawers do not need to have lids as the really smelly materials are not going to be trapped by these kinds of seals. There are many different options, but height is something to pay particular attention to. You could then have a special box for the very smelly ingredients with a good gasket seal, magical seals, etc.
Work surface
Spills will happen, sometimes whole bottles of undiluted ingredients get knocked over. Some ingredients are powerful and persistent, so that you whole living space will smell for days or longer. This will undoubtedly make you, the perfumer, unhappy, but will make any other people in the household extremely. This means you want to soak up the spill and dispose of it in an airtight container. You can’t soak it up if it has soaked into your work surface. Plastic and wooden surfaces will absorb and then release scents readily. Stainless steel, formica, and glass are options. You can get a 24”x24” steel sheet for a good price and tape the bottom side down to your existing table prevent sliding. This will give you enough room to work with materials on your scale without taking over the whole desk. Basenotes DIY posters have noted a range of solutions that are less metallic, such as taping down a couple of layers of cardboard and then removing the layer with any spills.
What to do if you may get to use a table in the family room a few times a week?
If you don’t have your own dedicated space to train, you will need a set-up that is sturdier (to handle movement in and out of closets) and more self-contained (e.g. scale and pipettes and everything need to go away). If you have to worry about the box breaking or the plastic bending and bottles crashing around every time you take your lab out of the closet, you are less likely to do anything if you have only an hour or so in the evening.
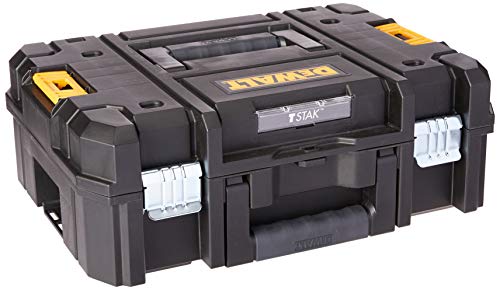
DEWALT Tool Box, TSTAK II, Flat Top
DEWALT is a good entry-level toolbox brand with a range of products that could support your mobile lab. This Flat Top has 15.5" x 11.0" x 4" usable interior dimensions, a bit higher in some places. With caps, the 30 ml Boston Round bottles are ~3.25” in height and about 1.25” in diameter. The cool thing about this and other brands is that they have a range of stackable and interlocking components, so you could build out a multi-case mobile lab that could be carried as a set or put on wheels.
How you design the inside of the case depends on your disposition. I originally purchased boxes designed for essential oils, but they maxed out at 15ml bottles, which did not work for long. I ended up pulling out all of the wooden dividers and working with these boxes before moving on to two-level plastic crafting bins from The Container Store. While this has been better in terms of storage capacity and flexibility, they aren’t really designed to move the weight of the filled glass storage bottles. I now use the wooden boxes for storing undiluted ingredients and am moving towards the stronger toolbox approach for diluted materials. For the case, you could go with a grid organizer similar to those employed in the essential oil boxes you may have seen. If you put a foam bottom and topper with adhesive backing on, you should have a customizable solution. I have found the grid dividers workable but not ideal. They do allow you to use most of the available space, but aren’t as rigid as I would like.
Grid Organizer
We discovered the world of pick and pluck foam inserts and are convinced this is the way to go for the mobile DIY perfume lab. You don’t want to have to think about breaking bottles as you move your set-up. There is much more flexibility in the dimensions of the pre-scored foam in the fantasy/sci-fi figurine world than in the precision tool, photography, and travel markets. This 11.8x*11.8”x2.75” insert has 10mmx10mm squares, which fit nicely to the ~30mm diameter of the 30ml Boston round bottles that I use for diluted ingredients. This does leave at least a 10mm gap between bottles, which may be more than you want to give up in terms of space.
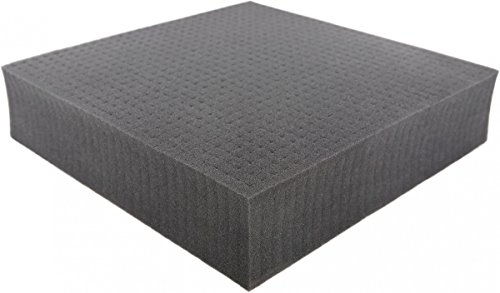
Pick and Pluck Foam Storage Insert
Check out photos of how we set up our boxes!
You could also use an essential oil travel case, but miss out on the stackability and durability of a tool box. Most of these cases won’t accommodate 30 or 60ml bottles that you may want to use.
Essential Oil Travel Case for 5-15ml bottles
Portable Work Surface
We don’t recommend dragging a steel sheet around the house to cover your temporary work surface. The piece of cardboard solution listed above could work pretty well, particularly if you purchase a lot of things online. Another idea that serves a few purposes is a disposable plastic table cover that you can cut to size. I like this solution because you could wrap your used disposable pipettes, gloves, etc. into the plastic when you are done and then throw it all away. if you wrap it tightly and perhaps tape it, you could keep a lot of odors from sneaking out too easily. A cheaper option, and perhaps better on the wrapping up function, would be cling wrap.
What Lab Supplies Do I Need?
YOU NEED A SCALE!
One of the most annoying debates in online DIY perfumery discussions is about whether one needs to work in weight measurements or if using the number of drops of each material is sufficient to create a blend.
Arguments Against Using Drops Instead of Weight
Not all of the materials you will use have the same density, so the same number of drops does not contain the same amount of material
Not all materials (including important natural materials) you will use are in liquid form
You won’t be able to put the same pressure on the pipette bulb every time. The surface tension varies across materials, both of which changes the size of the drop
You won’t be able to reproduce your work in drops with the precision needed to work at the scale affordable for DIY perfumers
No one in a chemistry lab is doing their work using drops out of a pipette to measure materials because they wouldn’t be able to reproduce their results. Why would perfumery be different?
Arguments for Using Drops Instead of Weight
You don’t want to buy a scale
Someone told you that drops were a more accessible way to share perfumery ideas
Based on recommendations from the Basenotes DIY community, we use the My Weigh iBalance 101, which is ~$100 and is accurate to 0.005g. The 100g weighing capacity will be a problem if you plan on moving from trials to production. Going down to 0.001g accuracy will cost a great deal and won’t be useful unless you are using advanced pipettes. The only problem with this scale has been the loud beep when you tare, which could bother the family in the late evening.
Carrier Solution for Liquid Perfume
This choice of a carrier is another controversial topic in the DIY community. A liquid carrier is a solution in which aromatic materials are diluted for use as a perfume or other scented product. The most common choices are fractionated coconut oil (FCO) and perfumer’s alcohol. You may consider trying both for yourself and see which you prefer. BE CAREFUL diluting a large amount of materials into one carrier before you have some experience with both and know in which direction you would like to go. The most common mistake would be new perfumers starting as all-natural in FCO and then slowly integrating a broader set of synthetic ingredients before deciding they want the performance gains from using alcohol. They may then have $100’s of materials diluted into FCO that they no longer use.
Fractionated Coconut Oil
For perfume, many natural perfumers use FCO as a carrier. FCO is distilled coconut oil, which is nearly odorless, lighter, and much more stable than the virgin coconut oil. Many people ask, “What can I do to make my essential oil perfume last longer?” Using fractionated coconut oil will make your perfume last longer, but this is not free. Your perfume will not have the projection or sillage that you have come to expect from commercial perfumes. This means, you will mostly be smelling the perfume on your skin and that no one else will smell it unless they smell your skin from very close. Having a skin scent for you and intimate others may be you goal, in which case the reduction in diffusion from using FCO is not a problem.
Pros
Increases longevity of perfumes
FCO is a healthy moisturizer for skin
Widely available and relatively affordable
Can be used to develop both liquid and solid perfumes with addition of a wax
Cons
Reduces diffusiveness of perfumes compared to alcohol
Can stain clothing
Not all materials dissolve fully in oil
Although more stable than undistilled oil, FCO has a much shorter shelf life than alcohol
Perfumer’s Alcohol
The most widely recommended carrier for perfume is perfumer’s alcohol, which is ~95% ethanol denatured with an odorless additive to make it not fit for consumption. Specially denatured alcohol (SDA)-40B is a common formulation; it includes an extremely bitter additive to prevent consumption. Ethanol is denatured so that excise taxes on liquor are not applied. Without a special license, purchases are limited to 5 gallons per year. SDA-40B can be purchased from Creating Perfume and Save on Scents. A gallon should be sufficient for most DIY perfumers. You can also make your own hand sanitizer. If you have trouble purchasing perfumer’s alcohol, you can also use a very high proof grain alcohol, such as Everclear 190 proof. The only real difference is that you will be paying the ~$20 tax/gallon. Everclear 190 is also not sold in 11 states.
Pros
Excellent solvent (you can mix most things into it)
Long shelf life and excellent preservative, no odor
Does not stain clothing
Cons
Higher diffusiveness offset by lower longevity compared to FCO
May have difficulty acquiring
Alcohol can dry skin with high exposure
Storage Bottles
We have been very happy with the quality of products from Glass Bottle Outlet. The size of the bottles you need will change as you progress. We suggest starting your DIY perfumery training with sample-sized ingredients, which are often 1ml or less. You can dilute to 10% by weight fitting easily into a 15ml (1/2 oz) bottle. Once you buy larger amounts of ingredients you plan on using regularly, you can switch to 30ml bottles.
We recommend using polycone or “cone” caps instead of bulb dropper caps. This is the case for those using FCO or alcohol as a carrier. The volatile materials in perfume ingredients will degrade the dropper bulb over time, leading to loss of the more volatile materials first. This will change the smell and performance of the diluted material compared to the original such that you will not have the correct understanding of the material and will not be able to recreate your blends in future batches. If you will be storing the bottles with light exposure, cobalt or amber bottles will reduce degradation from UV exposure.

30 ml Cobalt Glass Storage Bottles with Cone Cap
Pipettes
Getting liquid materials from one bottle to another (during transfer, blending, or dilution) is mostly accomplished with pipettes, which suction up and then dispense liquid with varying degrees of precision based on the design. For large transfers, such as from the gallon of perfumer’s alcohol to a decanter of alcohol used in dilution or blending (more on lab practices later), you may find pouring through a funnel to be a better idea than a transfer pipette. We suggest that new DIY perfumers use disposable plastic pipettes, which are generally used for a single session and always for a single ingredient or blend and then disposed. We don’t have a final opinion about the environmental impact of using fully disposable vs. disposable tips vs. cleaning glassware, but it is not as simple as saying that disposable pipettes are more wasteful. They are certainly affordable and practical for the DIY levels of volume and precision. The 3ml transfer size gives enough precision for getting started while making the dilution process not interminable. The next step would be to get smaller pipettes (e.g. 0.5ml). After that, moving to a micropipette with disposable tips will make sense for many people.
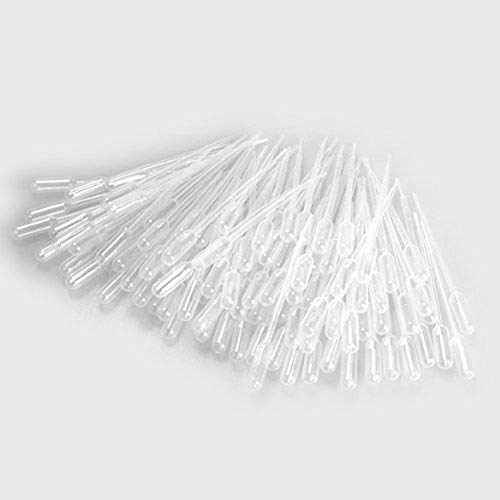
Disposable Plastic Pipettes, 3ml Transfer Size
Lab Utensils
Not every material is an essential oil. Some are powders, resins, highly viscous fluids (sticky), etc. You are going to need some relatively delicate stainless steel tools to get these substances out of one container and into your blend directly or into a storage bottle for dilution. We came across this nifty scoopula in a chemistry lab equipment review site and had to have it after trying to get powder (e.g. we are looking at you Veratraldehyde) into a bottle with a lab spatula.
Trial Vials and Tray
After getting all of your materials diluted, you will probably be itching to mix some stuff together. And you should. Why else would you get into this if you aren’t allowed to play around? Often, you will be testing different levels of 2 materials and then adding a 3rd material at different levels. Even with a small number of levels per material, you can quickly get over 10 mixtures per test. You may also want to store these and evaluate the blends a number of times. We started out using disposable tattoo ink cups, but they are easy to flip over and can’t be stored. They were cool for the first few days, but we would not recommend using them. Now we use a plastic vial rack with 2ml vials. There are many different styles of tubes and vials; just make sure that the vials have three things: 1) a top, preferable screw-top; 2) a flat bottom so it can be used on the scale without a stand; and 3) a place to label the sample.

Labels
There is nothing more frustrating than printing out beautiful labels for all of your materials than finding out after application that alcohol and oil will both ruin the ink and potentially remove the entire label from the glass bottle. For storing diluted materials, you are most likely to spill alcohol or FCO when using a transfer pipette or pouring. Putting the label on after you have filled the bottle prevents much of this problem, but still leaves room to smear the ink during use. After the first round of small dilution of sample materials, you may consider printing or using permanent marker on waterproof and oil-resistant labels. We like these laser-printer compatible, waterproof labels from Avery, which is the industry leader for printable labels. We usually just write on them with permanent marker, but printing does enhance usability and aesthetics, particularly if you are obsessed with using just the right font for every project.
In addition to full descriptions on the labels, it is very helpful to have a short label and, ideally, color coding on the top of the bottle cap. You can use a fine-tip permanent marker to make these. We like these labels from Solgit, which came with the storage boxes we first used for smaller dilutions. These are also printable sheets, so if you are that particular, you could do that as well. There are other sets of color-coded labels that are pre-printed with specific essential oil names. We don’t recommend these as you lose too much flexibility for limited time savings.
Other Supplies
Tester strips: Perfumers use narrow strips of bonded paper to dip into diluted materials or blends to evaluate the aromatic properties. These are a good price. We like the fragrance tester strips we got from Eden Botanicals, also for a good price.
Disposable Gloves: To prevent getting undiluted materials on your hands (see below on rubbing alcohol)
Isopropyl Alcohol (Rubbing Alcohol): Useful for cleaning up spills and reducing intensity of the smell of any spills on skin (washing hands with rubbing alcohol and then soap works pretty well ). Also useful for cleaning stainless steel tools. Never use rubbing alcohol to make perfume. It is not the same product as perfumer’s alcohol or grain spirits.
Sample spray and roller bottles: Eventually, you will want to use some of your blends or share them with others. We suggest getting the smallest possible sample roller ball bottles (for oils) and spray bottles (for alcohol) as the first step in this direction.
Where Can I Buy Essential Oils and Other Perfume Ingredients?
We have noted above the challenge of identifying high quality essential oils and other perfume ingredients. For rare and expensive natural products, adulteration with synthetic or cheaper, naturally-derived compounds is easily done without testing the product for its quality.
Ideally, reputable sellers should post or be able to provide upon request the following for every product:
MSDS: Material Safety Data Sheet: This document provides everything you would need to know about the safe handling, storage, mixing, and disposal of the ingredient.
Certificate of Analysis with batch number: This is probably the most important document for natural products and the one that is least available. This means that a hobbyist purchasing for educational purposes instead of developing a business relationship will have to find trusted suppliers through a broader social network, such as the Basenotes.net DIY Forum
Declaration of Allergens: In the European Union, retailers are required to declare whether any of 26 different allergenic compounds are included in the fragrance or cosmetic product. In the U.S. under the Fair Packaging and Labeling Act, the FDA does not have the authority to require retailers to declare specific ingredients in a fragrance in order to protect trade secrets. As a perfumer, you should be able to find out whether the materials you are using contain known allergens.
These suppliers have a strong reputation for quality, service, and price. We have purchased from five of these repeatedly (Aftelier Perfumes, Creating Perfume, Eden Botanicals, Perfumer Supply House, and Perfumers Apprentice) and will branch out to the rest of the list as needed for materials not carried by these sellers.
United States
UK and EU
What Materials Should I Buy to Get Started Making Perfume at Home?
Your initial goal is not to make any perfumes at all. Your goal is to rewire you brain so that you can smell the way that perfumers smell. Your sense of smell is the most powerful sense in the human body, able to differentiate up to 1 trillion different scents. Due to modernization and for other cultural reasons, most people ignore the many scents around them.
You need to wake up the part of your brain that is connected to your nose before you start spraying essential oils on people. David Ruskin, who gained the reputation of being somewhat cantankerous on the Basenotes DIY Forum due to his sometimes sharp responses, had this richly described piece of advice to new perfumers in a thread on tips for starting out,
“Enjoy your sense of smell, it is much underused. Get used to smelling everything you encounter; the flowers and leaves in gardens, herbs and vegetables at the Supermarket. When shopping smell as many products as possible, from Fabric Conditioners, to Soaps, to Floor Cleaners. Get used to using your nose, and trying to smell in an analytical way. Try to describe, in your head, what you are smelling. Ask yourself questions to help you describe. Not ‘Do I like it?’ but "What can I smell, that is interesting or unusual?’ ‘How does it smell?’ ‘Is it Citrus? Floral? Fruity?’ ‘If it is Citrus, what Citrus? Lemon? Grapefruit?’ and so on.”
Jean Carles, of Givaudan, is legendary in perfumery for guidance on training perfumers and on developing accords by systematic variation in ingredient proportions (explained below). His training program was used at the Givaudan perfumery school, which he founded in 1946. Graduates include Caron and Jean-Claude Ellena. Carles argued for regular (daily) training using two methods:
“Learn by Contrast”: Jean Carles arranged ingredients for natural and synthetic materials in two separate tables. Within these tables, he assigned olfactory families to each row (e.g. citrus, spicy, woody, animalic) and then included one material from each family within each column. The first step in training is to dip tester strips into the diluted materials (explained below) within a single column so that you are evaluating one example from each very different family. The sharp contrast across families helps to build out the rough outline of the new part of your brain you will create as you develop your nose. In addition to being able to distinguish notes across the samples, your goal should be to develop your own vocabulary for how to identify each scent. You can use a notebook and pen. We find that transferring these notes or taking them directly into a spreadsheet is useful for building out your own scent database. You may collect others’ descriptions of notes, but your own descriptions should drive your perfume creation. There is no universal language for scent, so one ends up linking the sense of smell to other senses. Some scents may be “bright,” “scratchy,” “blue,” “loud,” “cool,” etc.
“Learn by Similarity”: Once you are able to easily distinguish between fragrance families, you move on to working within a single family at a time. Jean Carles started with citrus. The first goal is to be able to distinguish notes within a family, which is more challenging than the initial contrasts. In addition to the identification task, this process helps you to refine your vocabulary by identifying the particular characteristics within a family. For example, within citrus, some may be “dry,” while others are “juicy.” Some of this process is metacognitive, in the sense that you know that you are learning and reflect on the process. However, most of this training is to develop a new part of your brain. There are many materials that take practice to even be able to smell at all.
So, what does all of that mean? What should I buy to get started? As we said in the budget section at the beginning of the guide, you would do well to start with only sample-sized purchases. There is a debate among the DIY perfumer community as to whether one should start learning with natural or synthetic products. We prefer starting with natural essential oils, extracts, and absolutes because these are the substances that we wanted to build our new scent brain with. At the time of writing, the smell of a myrrh C02 diluted in FCO and applied liberally has entered deep into my brain. This is an ancient material with deep religious meaning. I have not smelled a single synthetic material, or blend, that captures this essence. The synthetic materials are mainly derivative of and referring to natural products. Starting with synthetics has the advantage of being much simpler, which would help you move towards blending a perfume much more quickly. None of this is related to to the use of natural or synthetic ingredients when blending a perfume.
There are kits that you could purchase to get started. There are lists of “100 essential ingredients.” These are generally not designed to support the Jean Carles training method, but to give you a broader set of notes for potential perfume blends. The problem with this approach is that your goal should not be to make a perfume with the first purchase of materials. If you just wanted a perfume, it probably makes more sense (costs less money and less frustrating) to buy an existing product or go to a bespoke perfumer.
Knowing that you will buy more materials in the future, your goal should be to get good coverage across scent families as well as depth within each family.
What is a fragrance family?
In his glossary of terms, Arctander explained that botanical or other existing plant material classifications were not appropriate for perfume work. He declined to create a classification system and instead presented perfume and flavor ingredients in alphabetical order. Jean Carles included 16 families in the Givaudan natural material training table. Mandy Aftel has developed her Natural Perfume Wheel, which is very helpful when getting started.
As the Alexander Graham Bell quote from a 2000 review article on scent classification by Wise and colleagues shows, efforts to create a modern “scientific” classification system have been going on for more than a century, and have not reached consensus in 2020. In fact, Wise and colleagues note that efforts to categorize scents systematically were recorded in ancient Greece and likely occurred in other cultures.
This means that you are unlikely to find a “definitive” set of fragrance families to structure your training. We include a simplified training table with families informed by Jean Carles’, the Aftelier Wheel, and others. This results in a training table, and guide to purchasing sample sizes, for 66 natural materials. To reiterate, this is not a list of essential ingredients to make perfumes, but to launch your training program. When you are purchasing samples, get a few more scents that you have never smelled, but sound alluring from the description. I purchased a sample of fossilized amber for this reason as well as a tomato leaf base from Robertet.
“Can you measure the difference between one kind of smell and another? It is very obvious that we have very many different kinds of smells, all the way from the odour of violets and roses up to asafetida. But until you can measure their likeness and differences you can have no science of odour. ”
What You Should Purchase First to Begin Training Your Brain How to Smell Like a Perfumer
|
Family |
1 |
2 |
3 |
4 |
5 |
6 |
7 |
|---|---|---|---|---|---|---|---|
|
Citrus |
Lemon |
Lime |
Orange |
Mandarin, Red |
Grapefruit, White |
Bergamot |
Green Mandarin |
|
Agrestic |
Hay Absolute |
Oakmoss Absolute |
Immortelle Absolute |
Liatrix Absolute |
|||
|
Green |
Lavender, Maillette |
Lavender Absolute |
Clary Sage Absolute |
Basil, Sweet |
Rosemary, ct cineole |
Sage |
Angelica Root, C02 |
|
Minty |
Peppermint |
Spearmint |
|||||
|
Animalic |
Ambrette Seed CO2 |
Ambergris, Silver Tincture |
Hyraceum Absolute |
Beeswax Absolute |
|||
|
Heavy Floral |
Jasmine Absolute |
Orange Blossom Absolute |
Tuberose |
Ylang Ylang, Extra |
Champaca |
Lotus Absolute |
|
|
Light Floral |
Rose de Mai, Extract |
Rose Otto, Turkey |
Orris Butter |
Cassie Absolute |
Geranium |
Neroli, Morocco |
Chamomile, Roman |
|
Spicy |
Black pepper |
Clove bud |
Cinnamon |
Nutmeg |
Coriander Seed |
Cardamom C02 |
Ginger, Fresh |
|
Woody |
Sandalwood, Australian |
Sandalwood, New Caledonia |
Cedar, Atlas |
Cedar, Virginia |
Pine, Pinyon |
Agarwood |
Black Spruce |
|
Earthy |
Vetiver, Haiti |
Vetiver, Java |
Patchouli, Dark |
Carrot Seed |
Cepes |
Nagarmotha |
Fenugreek CO2 |
|
Balsamic |
Vanilla C02 |
Balsam of Peru |
Tonka Bean Absolute |
Benzoin |
Labdanum Absolute |
||
|
Resin |
Frankincense, Oman |
Myrrh C02 |
Opopanax |
I Received My Essential Oils, What Do I Do Now?
The first thing that I did when I bought a large batch of essential oils was to unpack them lovingly and stare at the vast collection of precious essences. I had to resist trying to smell these materials neat out of the sample vials. I got these materials diluted to 10% (which is what most recommend for training and experimental blending) in FCO as soon as possible. I made a number of mistakes in bottle size, label quality, etc.
· We recommend using 15 ml (1/2 oz) bottles for this first round of purchases.
· You can either use a printer or a permanent marker to pre-label the circular cap label and rectangular bottle label. We recommended these circle and these rectangle labels. You can pre-label all of the caps, but leave the rectangle until after you fill the bottle with the carrier and are able to clean the bottle. If you are using oil as a carrier, rubbing alcohol is useful for cleaning all of the oil off before applying the label. The waterproof labels are great, but one less assault from a mistake with the carrier oil is welcome.
· You can just dump the entire contents of the 1ml sample size into an empty bottle on top of a scale that has been tared (zeroed); you don’t need to use a pipette as you will lose much of the material to the vial and pipette. Then add your carrier solution until the total weight on the scale is 10x the weight of the fragrance material you added initially. This will leave you with a 10% solution by weight.
· We suggest using a separate container from the carrier solution bottle you purchased as a decanter. For example, pour with a funnel from the 1 gallon of perfumers’ alcohol into something like a 16 oz Boston round bottle. This will limit contamination risk back to the carrier that you will put into every solution. If you touch the tip of the transfer pipette to the bottle containing the fragrance material when filling it with carrier, you should dispose of that pipette and get a clean pipette to transfer from your carrier decanter. Particularly with aromachemicals, some strong materials can contaminate a very large volume of other solutions. This is a relatively high contamination risk period when you are handling many materials and pulling from a single source of carrier.
· Now that everything is diluted and labeled and organized (including creating a spreadsheet of all your materials), you should smell whatever you want in whatever way you want and celebrate this new practice. Then, get ready for your training.
How Do I Smell Essential Oils and Other Materials?
Smelling for the purpose of training is different than how we normally think of the action. This kind of smelling is most similar to wine tasting or coffee cupping. The goal of smelling for training is to minimize sensory distraction. Most importantly, minimize exposure to other intense smells. You also want to minimize exposure to the material with which you are training so that you delay the time to olfactory fatigue. Your short-term ability to smell a material will decline as you smell more of it so that you might not be able to smell it at all for a while. Ironically, the more often you train with a material, the better able you will be to smell it in the future.
There is no real “right” way to train, but the Jean Carles method above is intended to develop a broad mental map across fragrance families and then develop narrower distinctions within families to add texture to that map. Before beginning with a Jean Carles training session, which you should aim to do 2 times per day, we recommend that you smell one material at a time so that you develop a specific description in your own words and can start to pay attention to how the scent changes over time.
“Part of the ‘romance’ or ‘thrill’ in perfumery work lies in the fact that, not only are all the materials different in odor but hardly ever will two perfumers give identical descriptions of the same material or the same perfume.”
— Steffen Arctander
Single Material Scent Training
· Dip a tester strip to the first line, or to ~1/2 inch, into the 10% dilution. If it is diluted in alcohol, let the alcohol evaporate for 30 seconds before smelling
· Take a full breath in and then out with the strip far away from you so that you can’t smell it. Then slowly bring the tester strip closer to your nose as you take small “sips” of air through your nose with your mouth closed. When you first notice any smell from the sample, stop moving the tester strip closer to you. You may feel a slight tingle in your nose or brain as you struggle to place this scent in your memory. This is the moment when you expand the connections in your brain. Bring the strip a little closer to your nose, finding a spot where you are not straining, but it is not overwhelming. Ask some questions of the scent. Build a link to the rest of your senses, your emotions, and your memories:
o Do you taste something? Bitter? Sweet? Umami? There is not a correct taste; your goal is to intentionally integrate your senses. Taste and sense are integrated soon after scent perceptions are processed, so this may be
o Are you seeing a color from this scent? International Klein Blue, Burnt Sienna?
o Do you hear a specific sound? A bright, regal trumpet call? A softer woodwind section in harmony? The vibrational note of love from the viola d’amore?
o Is the scent scratchy? Silky? Bubbly?
o Does this scent like something else you have smelled in the past? Old books? Old socks? Can you make a link between this and another scent experience?
o How does this scent make you feel? Elated? Deeply sad? Frustrated? Wistful?
o Does this scent bring up memories? Even ones that don’t reference the scent? When you link the scent to your emotions and your memories, you are building a deep connection in your brain and body that will support your ability to create perfumes with meaning to other people. You won’t develop this scent empathy without first connecting deeply to yourself.
· Write these thoughts down without censorship. Put the strip aside for 5 minutes and repeat the process above. Do that again 10 minutes later, 15 minutes after that, 30 minutes later at an hour. Every hour for a while. You don’t need to track how long these scents last before they are gone (but if the character or intensity has not diminished, keep tracking). Instead, you are trying to evaluate how the characteristics of the scent change over time. Particularly for base notes, which last a long time, the characteristics of the scent may shift dramatically from the opening through the relatively stable, linear dry down that may last many hours. It is interesting to do this training in the evening and then check the tester strips in the morning. Perfume compositions are often designed to cover up the potentially displeasing opening notes of a base note material so that they can perform later in the dry down. Understanding the evolution of the scent profile through the dry down is a critical skill as you move forward to composing your own scents.
o You can do this process with a few scents per session. You may want to start with one scent and check the initial 30 minutes before taking a break and then starting with a new material. This way, you are able to focus on the relatively rapid changes that occur in the opening for each material while also getting exposure to more of your collection in fewer days. This is an important balance for training: focus on deep understanding of every material while building broader knowledge of scents and the relationships between them
“Learn by Contrast” Scent Training
The Jean Carles “Learn by Contrast” training builds on the work that you have already done with the individual scents. Your goal is to both refine your description of each scent and gain skill in blind identification of scents. For this practice:
· Select your diluted scents from column 1 in the table above: 1) Lemon; 2) Hay Absolute; 3) Lavender Maillette; 4) Peppermint; 5) Ambrette Seed CO2; 6) Jasmine Absolute; 7) Rose de Mai Extract; 8) Black Pepper; 9) Australian Sandalwood; 10) Haitian Vetiver; 11) Vanilla C02; 12) Omani Frankincense
· Label 12 tester strips with the name of the material and then dip the tester strips 0.5” into their respective 10% diluted solutions. You can bend the tester strips so that the portion with solution does not touch your work surface
· Smell each of the scents in sequence and review your thoughts against your notes from your single material training
· Smell pairs of scents separately. How are they different? How are they similar? How do you compare the scent of lemon to hay absolute? Black pepper to sandalwood? Are they both woody? Is black pepper brighter than sandalwood?
· Once you have spent some time building strong contrasts, spend a portion of each session doing blinded identification. This is easiest if you have someone to test you. You can just mix the strips around without looking at the label, but it isn’t as much fun. When you guess wrong, it is useful to compare the description of what you thought the scent was to the description you have for the scent. You may pick up similarities that you hadn’t noticed as well as emphasize contrasts that make the identification easier for you. Continue doing the blind testing until you can accurately identify all of the scents in the set. This will be much harder if you have not spent time with all of the materials independently
· In separate sessions, work your way through each of the columns. You may revisit some of the columns that were more challenging the first time. Once your descriptions for the materials are stable and you can do the identifications with ease, move on to the training within scent families
“Learn by Similarity” Scent Training
This next step in your training follows the same procedure as the learn by contrast process. This time, you will be working to further refine how you understand and describe characteristics of each scent by contrasting within scent families. How is lemon different than lime? Red mandarin vs. green mandarin? Perform the same blind identification training that you did with the learn by contrast sets.
Continue training in all three areas 1) single note focus; 2) learn by contrast; 3) learn by similarity. You will also benefit from purchasing and training with additional samples that build depth within fragrance families as well as purchasing scents in the more obscure families (gourmand, marine, smoky).
How Do I Compose a Perfume Formula?
Formula? Don’t you mean recipe? Perfumes are made with formulas (formulae if you fancy) because they require a list of ingredients with precise measurement by weight and standardized instructions for production. Recipes generally use measurement by volume (apologies to the bakers out there) and have relatively general instructions for preparation. Recipes can have a substantial degree of variation while still “following the recipe.” There should be minimal variation across preparations when following a formula. This is why you cannot compose perfume using drops and you cannot recreate your work using drops. There is just too much variation in the amount of material between drops to generate a consistent composition with repeatedly scent profiles.
The other reason that you are composing a formula is that understanding of the chemical properties of each material is required. For natural materials, you will need to understand the ratios of chemicals within each material, which varies across chemotypes and means of extraction among other factors.
The Good Scents Company provides the chemical properties and organoleptics for almost all entries and a “typical” Gas chromatography–mass spectrometry (GCMS) report.
Physical Properties
· Appearance: Describes color and opacity
· Specific Gravity: Lists the ratio of density of the compound compared to water at a specific temperature, with water set to 1. The lower the number below 1, the lighter the material is, meaning it take up more volume for a given weight of material.
· Pounds per Gallon: An estimated weight to volume conversion factor
· Refractive Index: A ratio measure greater than 1, this is the ratio of the speed of light through the substance compared to through a vacuum. When measured at 20 degrees C, this ratio is constant for a given material. Any impurity in the specimen will change the value. For this reason, perfumers use the refractive index of a chemical or a tight range for natural materials to check for contamination or adulteration
· Flash Point: Used to estimate the flammability of a substance to ensure safe transportation, handling, and storage
· Shelf Life: This ranges wildly by material. Volatile aldehydes can go off in 6 months to a year. Storage in alcohol extends this period compared to storing as a pure substance. Some materials actually improve with many years of aging
· Storage: This is usually cool and dark. Some materials need to be refrigerated
These data are important in the field, and for informing proper storage and handling, but are less important than one would hope for predicting the performance of any material when incorporated into a formula.
Organoleptics
· Odor Strength: Listed in this database as low, medium, and high along with a recommended dilution for evaluation
· Substantivity: This tells you how long the undiluted material remains perceptible on a paper test strip. These values are useful in terms of relative duration within a composition. When used within a perfume on the body, the substantivity will be much lower, 1-2 orders of magnitude lower. This is a very useful number for structuring perfume compositions over time.
These two data points are much more relevant for composing a perfume than the physical properties. However, the values in the database do not provide the kind of granularity in terms of strength that you will need to determine the right proportion of the concentrate for each material.
The TGSC database does include a recommended usage level in the Safety In Use section. These are also not exact recommendations, but give some sense of the order of magnitude and can inform as search of safety restrictions for a given product type.
Perfume Composition Structure
Perfumes are regular described as a collection of “notes” broken down by when they are primarily smelled during the time that elapses from the first application to the time when no scent can be detected. Each ingredient also has different smells in its own evolution as the more volatile compounds evaporate first, leaving a slow transition through body or “heart” notes that last for less time than the eventual dry out or “base” notes.
Top notes: Often lasting only in the first minutes or a quarter of an hour on skin and a few hours on a scent strip. Arctander notes that for any given natural perfume material, the top note, “… can be very characteristic of an essential oil and it is also very often a difficult one to reproduce in the work on ‘artificial’ essential oils, adulterations, cuttings, etc.”
Body or Heart Note: Heart notes generally last 30 minutes to 2 hours on skin. Arctander notes that while the body note lasts longer and has the characteristic scent of the overall oil, it is much easier to reproduce with artificial compounds.
Base note: Base notes can last ~5 hours and up to a couple of days on skin. Many materials have substantivity of 400 hours on a scent strip. The base note is as important as the top note of a material for revealing weaknesses due to material quality or artificial recomposition. Some materials have their characteristic note displayed primarily in the base, with either weak or unpleasant top notes. Others, like the lemon oil noted by Arctander, “… has a fresh and pleasant topnote of very short duration. It has only a faint and rather uncharacteristic body note, which may last one or two hours on a perfume blotter [test strip]. The Dry-Out is very fain, uninteresting, yet characteristic, but of little use to the perfumer.
There is no one way to structure a perfume formula to achieve the artistic intent of the perfumer. There are a number of characteristic proportions of top, heart, and base notes that can be used as a guide. Instead of following a guide, perfumers will evaluate a work in progress of their own or a colleague by evaluating whether they think the formula will achieve the intended goal. They may say that this formula is too “base heavy” to achieve the intended projection of bright floral notes. They may say that a top and heart-heavy composition has poor tenacity and displays unpleasant notes in the base due to the lack of materials with strong and pleasing scents in the base.
Standard Perfume Note Pyramid
If you start with what some might call a “standard",” pyramid, you see that the majority of the material is in the base note category with a roughly equal split between top and heart notes.
This may have a historical cause, in which early modern perfumers focused on building a harmonious base note that was then modified with some points of interest (i.e. heart notes). These are the proportions that Jean Carles used as instructive in his writing on creating perfumes for apprentices. This structure was then given a grand and fresh opening with citrus or herbal top notes that faded fast, but gave an exciting application and covered any of the volatile compounds from the base and heart that were not desirable for the composition.
This remains the approach that many perfurmers use today. Get a good base and then build up, modifying the ratios as you go to fit your vision.
How Do I Make My First Perfume?
Building a base accord from two materials
Jean Carles, of the training strategy above, is better known for his recommendations on how to systematically build perfume accords. The material can be found on the Perfumer’s Apprentice site.
The idea is relatively simple to start. Find two materials that you think will go together well in the base of your perfume. Often, there is a wood note and a musk note. You may focus on vetiver or patchouli. In the text, Jean Carles starts with Oakmoss as the foundational component of the Chypre style and builds an accord with Ambergris. He instructs the beginning perfumer to blend Oakmoss (O) and Ambergris (A) with the following ratios: O 9: A 1; O 8: A 2; O 7; A 3; O 6: A 4; O 5; A 5. This gives five different ratios to evaluate against each other. Jean Carles notes that the combinations in which Ambergris are higher are not needed because the perfumer intended the scent to be driven by Oakmoss.
Note this comment from Jean Carles on the initial smell of the base-only accord, “When smelling this blend on the smelling strip, we shall notice that its immediate effect is rather unpleasant, although this will fairly rapidly disappear and be replaced by a pleasant, long-lasting note essentially characteristic of the personality of the ultimate perfume.”
The advice trails off a bit on how to establish the ratios of “modifiers” intended to make the immediate effect of the base notes less unpleasant. Jean Carles argues that there must be some distinguishable characteristic of a composition, not just perfect blending across all notes. After laying out a rigorous training schedule and methodical accord construction approach, he closes the first essay with an exhortation for apprentice perfumers to seek creativity and a warning that many will not succeed in this task.
“The very selection a perfumer makes of the raw materials to be used as ingredients in a new formulation is the best of all possible standards for appraising the originality, the initiative and the genius of the creative perfumer, on which the success of the new perfume is entirely dependent. And while it is possible to devise a method which will enable the apprentice perfumer to understand and to acquire some sort of the technique, in perfumery as in many other fields many will be called but few chosen, since the essential qualities which lead to success cannot be taught, any more than can be taught enthusiasm, the joy of living and of creating, and the love for one’s calling. These are innate qualities without which there is no great perfumer.”
— Jean Carles


Neroli as the piney brightness, bitterness, and green woodiness from a wave of terpenes. It has the fruity, green floral notes of the best of rose and geranium. The indolic nature of the white flower is in full effect, but held at just the level so that it does not overwhelm. A hint of spice . . . what’s not to love?